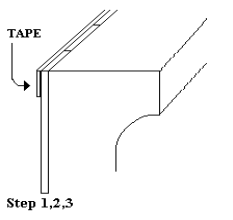
Step 1. Remove any burrs on top of the tile with an abrasive stone, at least 1” back from the tile. This will allow the tile strip to lay flat.
Step 2. Wipe the tile down with a clean cloth to remove any moisture or dust.
Step 3. Run a piece of bending tape along the top of the tile. This tape is for easy removal of the extender after the job is complete. Let one end of the tape hang down into the pool twenty four inches.
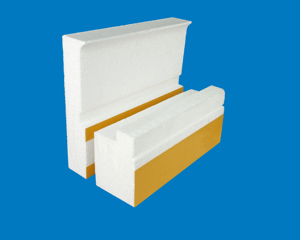
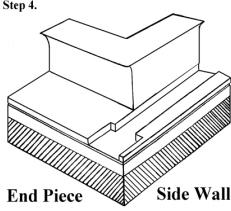
Step 4. Place the preformed corners in the corners opposite the roller. There is a groove cut in the corners. This groove should run parallel with the track side. Peel the brown paper on the double faced tape (one side at a time). Then line up the shelf of the corner with the tile. Press the form to the tile.
Note: During cold weather it may be necessary to warm the tile prior to sticking the form.
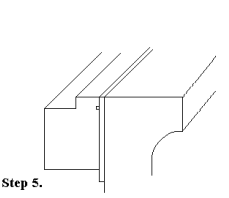
Step 5. Peel the paper from the double-faced tape (one foot at a time).Then line the top of the extender up with the tile (as shown in picture). Press the extender to the tile.
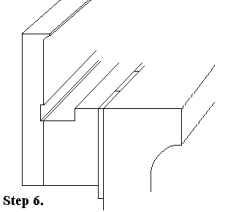
Step 6. Peel the paper from the face form and line the bottom of the face form up with the bottom of the extender. Press the face form to the extender.
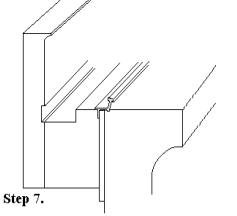
Step 7. Place the tile strip in the form (as shown in picture). The tile strip should lay flat on top of the tile and be butted up snug to the next tile strip. This is important as the tile strip will be showing after the job is complete.
Step 8. End piece (the side of the pool opposite the roller). All the end pieces will be marked “END PIECE”. Place the extender on (it will be upside down).Then the face form and the tile strip.
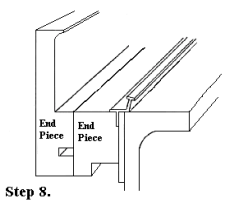
Note: The small piece of track that attaches to the pulley should have slotted holes. The slotted holes are to let the track slide out if you ever have to replace the pulley or cable. You can ask the manufacturer of the track to make these holes.
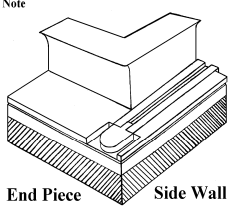
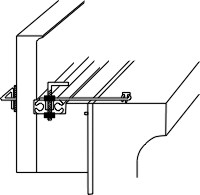
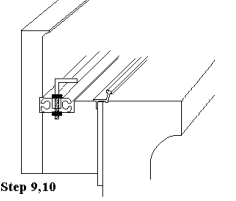
Step 9. Pre-drill the holes in the cover track (approximately 24 on each side of the pool).Then put a nut on the anchor, slide the anchor into the track, then put on the second nut (leave 1/8” of tread exposed after second nut). Do this for the entire track.
Step 10. Place the track into the groove (as shown in picture). Press the track down hard enough to make anchor bolt impression in the foam. Then remove track and cut or burn hole in foam large enough to receive anchor and nuts. Insert the lead ropes and place the track back in the form.
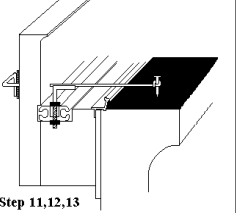
Step 11. Lay a bond breaker down on the bond beam. The bond breaker will separate the concrete from the tile bed, so if the soil shifts, the tile won’t be damaged. The bond breaker can be 15 lb felt. Structural Considerations: If the installation is a coping pour, DO NOT apply a bond breaker as it necessary to adhere the concrete to the bond beam.
Step 12. Drive the concrete nails into the bond beam 7” apart and 5” from the tile.
Step 13. Push the tie wire (with washer) through the form even with the tile strip. Hold the form with slight pressure and tie the tail of the tie wire around the nail. The tie wire must be on top of the tile strip for support and to hold the tile strip down. Do steps 11 through 13 for end piece also.
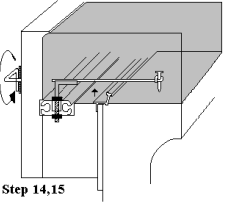
Step 14. While pouring tap the form to release air bubbles. This will help prevent honeycombing.
Step 15. When the concrete is strong enough to support it's own weight, the forms can be removed. To remove the form, twist the tie wire head, it will break the tie wire inside the concrete. Then pull the form away exposing the face for the finish. Leave the extenders for 12 hours. Then pull on the bending tape straight down to remove the extender.
Note: Removing the forms one piece at a time will help keep the moisture in the concrete to allow adequate time to finish.